How to improve wireless microphone audio quality for live streaming is crucial for professional-sounding broadcasts. This guide delves into the technical aspects of wireless microphone systems, offering practical strategies to enhance audio clarity and minimize interference. We’ll explore microphone selection, placement techniques, signal processing, equipment choices, and post-production enhancements, equipping you with the knowledge to deliver high-quality audio to your viewers.
From understanding the nuances of UHF and 2.4GHz frequencies to mastering audio editing software, this comprehensive resource covers all the bases. We’ll examine how different microphone polar patterns affect sound capture, how to effectively use audio compressors and equalizers, and how to mitigate environmental noise. By the end, you’ll be confident in your ability to troubleshoot common audio problems and deliver a polished, professional live stream.
Understanding Wireless Microphone Technology
High-quality audio for live streaming hinges on a solid understanding of wireless microphone technology. Choosing the right system and troubleshooting potential issues requires familiarity with the different components and their interactions. This section will explore the key aspects of wireless microphone systems to help you achieve optimal audio performance.Wireless microphone systems transmit audio signals without the constraints of physical cables.
This offers greater freedom of movement for performers, but introduces complexities in signal management.
Wireless Microphone Frequency Bands
The frequency band a wireless microphone operates on significantly impacts its performance and susceptibility to interference. Two common bands are UHF (Ultra High Frequency) and 2.4GHz. UHF systems generally offer better range, less susceptibility to interference from other devices (like Wi-Fi), and superior audio quality, although they require licensing in some regions. 2.4GHz systems are more affordable and readily available, but are more prone to interference from other 2.4GHz devices such as Wi-Fi routers and Bluetooth devices.
The choice depends on your budget, location, and the potential for interference in your environment. For instance, a busy urban setting with numerous Wi-Fi networks might necessitate a UHF system for reliable performance. A smaller, less congested venue might find a 2.4GHz system sufficient.
Components of a Wireless Microphone System
A typical wireless microphone system comprises three main components: the transmitter, the receiver, and the antenna. The transmitter, attached to the microphone, converts the sound waves into radio waves. The receiver, connected to your audio mixer or recording device, decodes these radio waves back into audio signals. The antenna plays a crucial role in both transmitting and receiving the signals effectively.
A poorly designed or positioned antenna can significantly impact the quality and reliability of the signal, leading to dropouts or interference. For example, a poorly shielded antenna might pick up unwanted signals from nearby electronic devices, resulting in audio noise. Similarly, a poorly positioned antenna can lead to weak signals and dropouts.
Causes of Wireless Microphone Interference and Signal Dropouts
Several factors can contribute to interference and signal dropouts. These include:
- Other 2.4GHz devices: As mentioned, Wi-Fi routers, Bluetooth devices, and even microwave ovens operating on the 2.4GHz band can interfere with 2.4GHz wireless microphones.
- Physical Obstructions: Walls, metal objects, and even large crowds can attenuate the signal, leading to dropouts or reduced audio quality. Thick concrete walls, for instance, can significantly weaken the signal, requiring adjustments to antenna placement or potentially a higher-powered system.
- Signal Frequency Conflicts: Multiple wireless microphone systems operating on the same frequency can cause interference. Careful frequency coordination is crucial to avoid this, particularly in larger events with multiple microphones in use.
- Environmental Factors: Extreme weather conditions like heavy rain or snow can affect signal transmission. Electromagnetic interference from power lines or other industrial equipment can also impact audio quality.
- Low Battery Power: A low battery in the transmitter will reduce the power of the signal, leading to dropouts and inconsistent audio quality. Using fresh batteries is crucial for reliable performance.
Optimizing Microphone Placement and Technique

Achieving high-quality audio in live streaming relies heavily on strategic microphone placement and skilled handling. Careful consideration of these factors significantly reduces unwanted noise and enhances vocal clarity, resulting in a more professional and engaging viewing experience for your audience. This section details best practices to achieve optimal audio quality.
Proper microphone placement is crucial for minimizing background noise and maximizing voice clarity. The distance between the microphone and the sound source (your voice) directly impacts the audio signal’s strength relative to any ambient noise. Similarly, the microphone’s orientation relative to the sound source influences how much of the surrounding environment is captured.
Microphone Placement for Optimal Audio
Positioning the microphone appropriately minimizes unwanted sounds while prioritizing your voice. Ideally, place the wireless microphone as close as possible to your mouth, but avoid it being too close, as this can lead to proximity effect (an unnatural bass boost). Aim for a distance of approximately 6 to 12 inches. This minimizes background noise pickup while ensuring a strong, clear vocal signal.
Experiment to find the sweet spot that balances proximity and clarity. Consider the environment; in a quieter setting, you can afford a slightly greater distance, while a noisy environment necessitates closer placement. Further, ensure the microphone is positioned to avoid pointing directly at reflective surfaces (walls, windows) which can create echoes and reverberations.
Microphone Handling Techniques to Minimize Noise
Handling noise is a common problem with wireless microphones. The simple act of holding or moving a microphone can introduce unwanted sounds into the audio signal. Careful handling techniques significantly mitigate this. Avoid touching the microphone capsule (the sensitive part at the end) and try to keep your hands still while speaking. If you need to move the microphone, do so slowly and deliberately.
Using a microphone shock mount, a small device that suspends the microphone to absorb vibrations, can further reduce handling noise. For lavalier microphones (those clipped to clothing), ensure the wire is properly secured to minimize rustling against clothing.
Comparison of Microphone Polar Patterns
Different microphones utilize various polar patterns, each impacting how they capture sound. Understanding these patterns helps in selecting the most appropriate microphone for your live streaming setup.
| Polar Pattern | Description | Advantages | Disadvantages |
|---|---|---|---|
| Omnidirectional | Captures sound equally from all directions. | Good for capturing ambient sounds, multiple speakers. | Highly susceptible to background noise. |
| Cardioid | Captures sound primarily from the front, with reduced sensitivity from the sides and rear. | Good for isolating the main sound source, reducing background noise. | Can be affected by sound sources slightly off-axis. |
| Supercardioid | Similar to cardioid but with a narrower pickup pattern and higher sensitivity from the front. | Excellent for isolating the main sound source, further reducing background noise. | More susceptible to feedback than cardioid. |
| Hypercardioid | Even narrower pickup pattern than supercardioid. | Best for isolating the main sound source in very noisy environments. | High susceptibility to feedback; requires precise placement. |
Enhancing Audio Signal Processing
Post-capture audio processing plays a crucial role in refining the sound from your wireless microphones, transforming a potentially raw and uneven signal into a polished and professional-sounding stream. By carefully utilizing tools like compressors, equalizers, and gates, you can significantly improve the clarity, consistency, and overall quality of your audio. These tools help manage dynamic range, eliminate unwanted noise, and shape the frequency balance to best suit your needs.
Digital audio workstations (DAWs) and dedicated audio interfaces often include these processing tools. Understanding their functions and applying them judiciously is key to achieving a professional-sounding stream. Remember, subtle adjustments are usually more effective than drastic changes.
Compressor Usage for Dynamic Range Control
Compressors reduce the dynamic range of an audio signal, making loud sounds quieter and soft sounds louder. This results in a more consistent audio level, preventing sudden peaks (clipping) that can distort the sound. A compressor works by measuring the incoming audio signal’s amplitude. When the signal exceeds a set threshold, the compressor reduces its gain, lowering the volume.
The amount of gain reduction is determined by the ratio setting. A higher ratio provides stronger compression. For example, a 4:1 ratio means that for every 4dB increase above the threshold, the output only increases by 1dB. The attack time determines how quickly the compressor reacts to a signal exceeding the threshold, while the release time dictates how quickly it returns to normal gain after the signal falls below the threshold.
Properly setting these parameters is crucial. For live streaming, a gentle compression with a moderate ratio (around 4:1), fast attack, and medium release often works well, preventing harshness while maintaining dynamics. Over-compression can lead to a lifeless, unnatural sound.
Equalizer Application for Frequency Shaping
Equalizers (EQs) allow you to adjust the level of different frequencies in your audio signal. This is useful for shaping the overall sound, enhancing clarity, and mitigating unwanted frequencies. EQs can be parametric, allowing for precise control over specific frequency bands, or graphic, offering a visual representation of the frequency spectrum and allowing for broad adjustments. For instance, a high-frequency boost can add brightness and clarity, while a low-frequency cut can reduce muddiness or rumble.
When using an EQ, it’s best to listen critically and make small adjustments. Excessive EQing can lead to an unnatural or harsh sound. A common issue with wireless microphones is proximity effect, which boosts low frequencies when the microphone is close to the sound source. A gentle high-pass filter (a type of EQ cut) around 80-100Hz can help mitigate this.
Gate Implementation for Noise Reduction
A noise gate automatically reduces or mutes the audio signal when it falls below a certain threshold. This is extremely helpful in reducing background noise and improving the signal-to-noise ratio. Think of it as a volume control that automatically turns down the volume when the sound is too quiet. The threshold determines the minimum audio level required to keep the gate open.
The attack time controls how quickly the gate closes when the signal falls below the threshold, and the release time determines how quickly it reopens when the signal rises above the threshold. A slow attack can prevent the gate from chopping off the beginning of soft sounds, while a fast release prevents lingering noise after the sound stops. For live streaming, careful adjustment is key to avoid unintended muting of quiet speech or musical passages.
A well-adjusted gate can dramatically improve audio clarity by eliminating distracting background hums, hisses, or other ambient noises.
Choosing the Right Equipment
Selecting the appropriate equipment is crucial for achieving high-quality wireless microphone audio in live streaming. The right tools will minimize background noise, ensure consistent signal transmission, and ultimately enhance the overall listening experience for your viewers. Investing in quality components will pay dividends in the long run, leading to a more professional and polished stream.
The selection process involves considering several factors, including budget, the type of event being streamed, and the desired level of audio fidelity. Understanding the capabilities and limitations of different equipment will help you make informed decisions that optimize your live stream’s audio quality.
Essential Equipment for Wireless Microphone Audio
A robust setup involves more than just a wireless microphone. Several components work together to capture, process, and transmit high-quality audio. The following list Artikels essential equipment for improving your live stream’s audio quality.
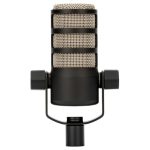
- Wireless Microphone System: This is the core component, consisting of a transmitter attached to the microphone and a receiver that connects to your audio interface or mixer.
- Audio Interface or Mixer: An audio interface acts as a bridge between your microphone and computer, while a mixer allows you to control multiple audio sources and apply effects. For simple setups, an interface might suffice; more complex streams often benefit from a mixer.
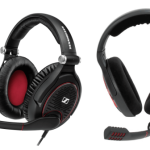
- Headphones: Closed-back headphones are essential for monitoring audio levels and preventing feedback. They isolate your ears from the surrounding environment, allowing for accurate audio monitoring.
- XLR Cables: High-quality XLR cables are necessary for connecting microphones, mixers, and audio interfaces. These cables ensure a reliable and noise-free connection.
- Microphone Windscreen (for outdoor use): Reduces wind noise significantly when recording outdoors.
Comparing Wireless Microphone Systems
Wireless microphone systems vary greatly in price, features, and audio performance. Factors such as frequency range, operating distance, and power requirements are critical considerations. Let’s compare some common types.
| Feature | Budget System (e.g., some entry-level systems) | Mid-Range System (e.g., Shure BLX) | Professional System (e.g., Shure ULX-D) |
|---|---|---|---|
| Price | Lower | Moderate | High |
| Frequency Range | Limited | Wider | Very Wide, often with selectable frequencies to avoid interference |
| Operating Distance | Shorter | Longer | Significantly Longer, often with multiple antenna diversity for improved reception |
| Audio Quality | Acceptable for basic use, but may have noticeable noise or distortion | Good, suitable for most live streaming applications | Excellent, minimal noise and distortion, even in challenging RF environments |
| Features | Basic functionality | Advanced features such as frequency scanning and power management | Advanced features plus robust interference rejection, and potentially network control capabilities |
Key Specifications for Wireless Microphone Systems
When choosing a wireless microphone system, several key specifications will directly impact audio quality and reliability. Careful consideration of these aspects will ensure a successful live stream.
- Frequency Range: A wider frequency range offers more channels and reduces the chance of interference from other wireless devices. Consider the frequency bands available in your region.
- Operating Distance: The maximum distance between the transmitter and receiver. Choose a system with a range sufficient for your streaming environment.
- Power Requirements: Battery life and power source options (AA batteries, rechargeable batteries, or external power supply). Longer battery life reduces interruptions.
- Latency: The delay between the sound being captured and the sound being heard. Lower latency is crucial for live performances to maintain synchronization with the video.
- Dynamic Range: The difference between the quietest and loudest sounds the system can handle without distortion. A higher dynamic range is desirable for capturing a wider range of audio levels.
Managing Interference and Environmental Factors: How To Improve Wireless Microphone Audio Quality For Live Streaming

High-quality audio for live streaming depends not only on microphone choice and placement but also on effectively managing interference and environmental factors that can degrade your signal. These external influences can significantly impact the clarity and fidelity of your audio, leading to listener frustration and a less professional presentation. Addressing these issues proactively is crucial for a successful stream.Minimizing RF interference is paramount for a clean wireless microphone signal.
Radio frequencies (RF) are shared by many devices, and unwanted signals can overwhelm your microphone’s transmission. Employing strategies to reduce this interference improves the reliability and quality of your audio.
RF Interference Mitigation Strategies
Reducing RF interference requires a multi-pronged approach. First, survey your environment for potential sources of interference, such as Wi-Fi routers, Bluetooth devices, and other wireless microphones. If possible, physically distance your wireless microphone receiver from these devices. Switching to a less congested frequency channel on your wireless microphone system can also dramatically reduce interference. Consider using a directional antenna on your receiver to further improve signal reception and minimize unwanted signals.
Finally, employing frequency coordination software can help identify and avoid crowded frequencies. For instance, some professional wireless microphone systems offer software that scans the RF spectrum to suggest optimal, less congested frequencies.
Ambient Noise Reduction Techniques
Ambient noise, including background conversations, HVAC systems, and street traffic, can severely impact audio quality. Several methods can effectively reduce this unwanted sound. Acoustic treatment of your streaming environment is a highly effective approach. This involves strategically placing sound-absorbing materials, such as acoustic panels or bass traps, to dampen reflections and reduce reverberation. The placement of these materials should be carefully considered based on the room’s acoustics; generally, they are most effective on walls and ceilings where sound reflections are most pronounced.
In addition to acoustic treatment, consider using noise-canceling software or hardware. Noise-canceling software can process the audio signal to reduce consistent background hums or static. Noise-canceling microphones themselves are also effective, though they might not completely eliminate all background noise.
Common Environmental Factors and Solutions
Environmental factors significantly impact wireless microphone audio quality. The following table Artikels some common issues and their solutions:
| Environmental Factor | Impact on Audio Quality | Solution |
|---|---|---|
| Temperature Extremes | Can affect the performance of electronic components, leading to signal dropouts or distortion. | Maintain a consistent temperature in your streaming environment. Consider using climate-controlled equipment cases for sensitive wireless gear. |
| Humidity | High humidity can cause corrosion and damage to electronic components, leading to signal degradation or failure. | Use dehumidifiers to maintain appropriate humidity levels. Ensure proper ventilation to prevent moisture buildup. |
| Physical Obstructions | Walls, furniture, and people can obstruct the signal path between the microphone and receiver. | Choose a line-of-sight path between the transmitter and receiver whenever possible. Use booster antennas if necessary. |
| Electromagnetic Fields (EMF) | Strong EMF from power lines, motors, or other electronic equipment can cause interference. | Distance your wireless microphone system from sources of EMF. Use shielded cables to minimize interference. |
Post-Production Audio Enhancement
Post-production audio enhancement is a crucial step in achieving high-quality audio for your live streams. Even with meticulous pre-production planning, some audio imperfections are inevitable. This stage allows you to refine your audio, removing unwanted noise and enhancing the clarity and overall listening experience for your viewers. Proper post-production techniques can significantly improve the professional quality of your live stream recordings.
Utilizing audio editing software provides the opportunity to address various audio issues that may have occurred during the live broadcast. This involves cleaning up the audio track, removing background noise and unwanted sounds, and adjusting levels to optimize clarity and balance. This process is essential for producing a polished final product.
Noise Reduction Plugin Application
Effective noise reduction is vital for improving audio quality without sacrificing the integrity of the original recording. Carefully selecting and applying noise reduction plugins is key. First, identify a section of your audio containing only background noise. Then, use the plugin’s “noise print” function to analyze this noise profile. The software will then use this profile to identify and reduce similar noise throughout the rest of your audio track.
Overly aggressive noise reduction can lead to artifacts, such as a muffled or unnatural sound. Therefore, it’s crucial to use these plugins judiciously and experiment with different settings to find the optimal balance between noise reduction and audio preservation. For example, iZotope RX is a widely used professional-grade tool offering advanced noise reduction capabilities. It allows for precise control and minimizes the risk of unwanted artifacts, making it suitable for even delicate audio materials.
Common Audio Editing Techniques, How to improve wireless microphone audio quality for live streaming
Several common audio editing techniques can significantly enhance the clarity and overall sound of live stream audio. These techniques, when applied appropriately, can make a substantial difference in the final audio quality.
Equalization (EQ): EQ allows you to adjust the balance of different frequencies in your audio. Boosting certain frequencies can enhance clarity and presence, while cutting others can reduce muddiness or harshness. For instance, boosting the high frequencies slightly can improve vocal articulation, while reducing low-frequency rumble can eliminate unwanted bass buildup.
Compression: Compression reduces the dynamic range of your audio, making quiet parts louder and loud parts quieter. This results in a more consistent and even audio level, making the audio easier to listen to. For instance, applying compression to a vocal track can even out variations in volume, ensuring that the vocals remain clear and prominent throughout the recording.
De-essing: De-essing is a specific type of compression used to reduce harsh sibilance (hissing sounds) in audio, particularly in vocal recordings. This is often achieved by using a narrow band compressor targeting frequencies around 5-8kHz, where most sibilance occurs. This prevents harshness and ensures smoother and more pleasant listening. For instance, using a de-esser on a vocal track with prominent sibilance can dramatically improve the listening experience without sacrificing the clarity of the vocals.
Gate: A gate automatically reduces the volume of audio signals below a certain threshold. This is particularly useful for reducing background noise during periods of silence or low-level audio. For example, this can effectively reduce background hum or low-level room noise during pauses in a live stream.
Visual Representation of Audio Quality Issues

Understanding how audio problems manifest visually on a waveform is crucial for diagnosing and rectifying them. A waveform, a visual representation of audio as a graph of amplitude over time, provides a clear picture of the audio signal’s characteristics, revealing imperfections that might be subtle to the ear alone. By analyzing the waveform, we can pinpoint the source and nature of audio quality issues and apply appropriate solutions.Analyzing waveforms helps identify and address various audio artifacts that degrade the quality of wireless microphone audio for live streaming.
These visual cues provide a powerful diagnostic tool for audio engineers and producers.
Common Audio Artifacts and Their Waveform Representations
Common audio artifacts, such as pops, clicks, and hum, appear distinctly on a waveform. Pops and clicks manifest as sudden, sharp peaks or spikes in the waveform, significantly deviating from the overall signal. A pop, typically louder and broader than a click, might appear as a large, abrupt upward or downward spike, while a click is usually a much narrower, sharper spike.
Hum, on the other hand, presents as a consistent, low-frequency sine wave superimposed on the main audio signal. This low-frequency wave creates a regular, undulating pattern in the waveform, often visible as a gentle ripple underlying the main audio. The frequency of the hum determines the spacing between these ripples; a lower hum frequency will result in wider spacing, while a higher frequency hum will appear as more closely spaced ripples.
Severe hum can overwhelm the desired audio signal.
Pops and clicks are often caused by transient electrical noise or physical impacts on the microphone, while hum is frequently caused by electrical interference from nearby power sources or improperly grounded equipment.
Effects of Audio Processing Techniques on Waveforms
Different audio processing techniques visibly alter the waveform. For instance, applying a compressor will reduce the dynamic range, making the peaks less pronounced and the troughs less deep. Visually, this results in a waveform that is more compressed vertically, with a smaller amplitude range. Conversely, an expander would have the opposite effect, stretching the dynamic range, resulting in a waveform with more pronounced peaks and troughs.
A limiter will prevent the signal from exceeding a certain threshold, effectively “flattening” the peaks of the waveform. Equalization (EQ) affects the waveform by boosting or cutting specific frequency bands. Boosting a frequency band will increase the amplitude of the corresponding frequencies in the waveform, while cutting a frequency band will decrease the amplitude. This will show as either amplified or reduced sections of the waveform across the frequency range affected by the EQ.
Finally, noise reduction algorithms typically smooth out the waveform, reducing the amplitude of high-frequency noise and subtle variations. This smoothing effect reduces the visual “roughness” or irregularity of the waveform.
Conclusion
Mastering wireless microphone audio for live streaming involves a multifaceted approach, encompassing both technical understanding and practical application. By implementing the techniques discussed—from optimizing microphone placement and signal processing to managing interference and utilizing post-production enhancements—you can significantly elevate the audio quality of your live streams. This will ultimately enhance viewer engagement and create a more professional and enjoyable viewing experience.
Remember, consistent practice and attention to detail are key to achieving consistently high-quality audio.
FAQs
What is the best wireless microphone frequency to avoid interference?
The “best” frequency depends on your environment and local regulations. UHF generally offers better range and less interference than 2.4GHz, but 2.4GHz is more readily available. Consider using a spectrum analyzer to identify clear channels.
How can I test my wireless microphone system for interference before a live stream?
Perform a thorough test run in your streaming environment, checking for dropouts, static, or other interference. Use a spectrum analyzer or frequency scanner to identify potential sources of interference and adjust accordingly.
What are the common signs of a low-quality wireless microphone signal?
Common signs include static, dropouts, distorted audio, excessive background noise, and a generally muffled or unclear sound. These issues can often be traced back to interference, improper setup, or poor microphone technique.
Can I use a lavalier microphone for live streaming?
Yes, lavalier microphones are a popular choice for live streaming, offering a discreet and hands-free solution. However, be mindful of proximity to the sound source and potential for clothing noise.